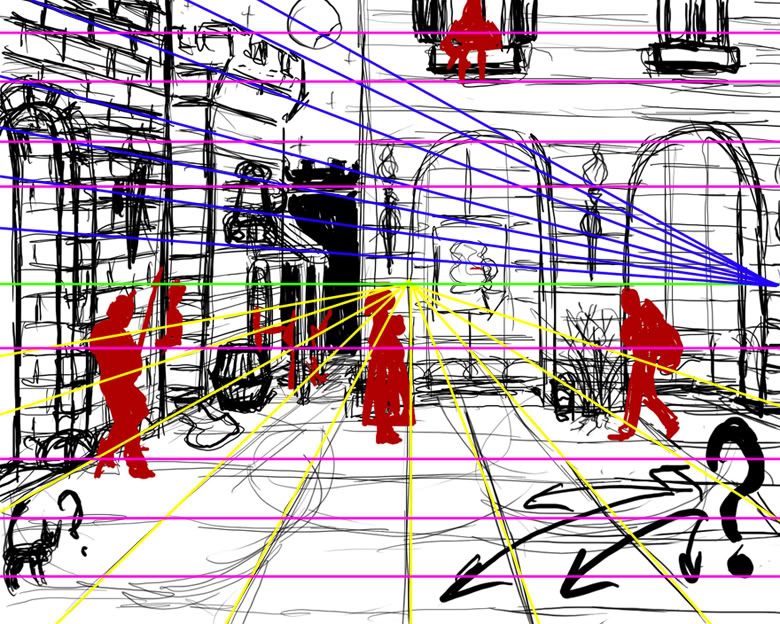
I think you're doing the perspective well. I've traced where it looks to me like the horizon and the various vanishing points are in this paintover.
I'm not much of a perspective expert, but here's my thoughts:
Green is the horizon, or eye level. All vanishing points, except those for inclined planes, have to sit on this line (they can be out of the frame, though). (Any vp above or below this line will create an inclined or declined plane.)
-keep in mind that placing your horizon so close to the middle of the frame, as you've done here, can often result in a slightly stale, boring composition. For more drama, move your horizon towards the top or the bottom of the picture plane, or even tilt it at an angle.
Blue traces to the vanishing point for the walls and tower. Some of your lines here are off; they don't all go to the same vanishing point, even though they should be parallel. (especially in the stonework). Trace them to the point where the blue lines converge to fix this.
Yellow traces to the vp of the ground plane. All looks well, here.
Purple goes to a vanishing point far, far off the frame, so far away that it's lines appear parallel. It references the building in midground that we're seeing straight on; I just drew these for clarity.
The figures are done well; it looks like you know what you're doing, here. All of their heads sit at about our eye-level, so we can infer that the ground plane is level, they're all relatively equal height, and we're looking on the scene from their height.
One thing I think it's important to remember; you can have as many vanishing points as you need for various objects; they just all need to sit on the same eye-level (horizon). Sometimes it's necessary to add more vps, like when you're drawing an object that's rotated differently than other objects in the scene.
I think Spreggo linked Andrew Loomis' book Successful Drawing in the OP; that book has a great section on perspective in it.

 Author
Topic: +The Engravers Guild+ (Read 383663 times)
