Here is a step by step process for building a pump stack straight down through the aquifer. Sand included!
Some things about aquifers.
Water does not flow diagonally from aquifer tiles.
Water does flow from aquifer based ceiling tiles.
Some things about the method. Basically each level is a duplicate image of the one on top of it. You have to dig out and replace all aquifer based material. Pumps line up as a normal pump stack does. Water is moved up the pump stack and is pushed into a water dump. The stack itself is not sealed off so dwarves will be using the ramp directly underneath the pump intake to move on.
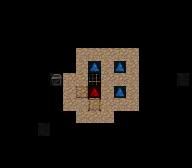
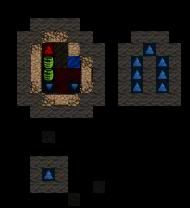
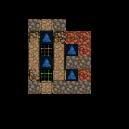
Initial setup: The water reactor to the right provides more than enough power. The first pump that is placed has to be a hanging construction so it can pass power to the pump below it. The floor of the water dump leading off to the south is wood flooring to prevent plant growth from plugging up the operations.

Here is the assemblage on top for power:
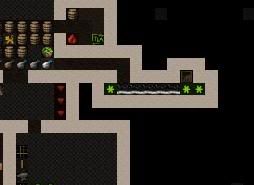
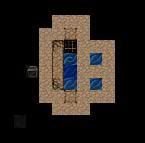
Here is the top side water dump in action.

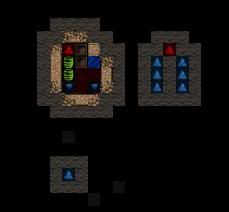
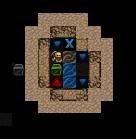
The first aquifer level. Dig out and place wooden walls to the west, north, and east first. Then cut a drain to the south. This drain is actually where the power will be passed to the next pump down when it comes time to work in that layer. Place a grate over the drain for safety and accessibility.
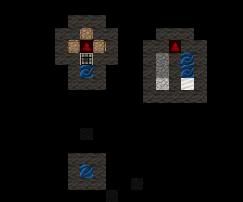
It is easier to just go ahead and cut the drain at the bottom and place a grate there. Then go back and dig out and place more wooden walls.
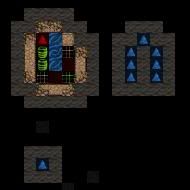
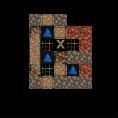
Cut the first drain/shaft to the right and grate it. This drain is needed so you can ultimately have enough room to maneuver in levels. It also helps with the staircase placement that is going to be needed.

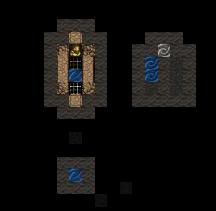
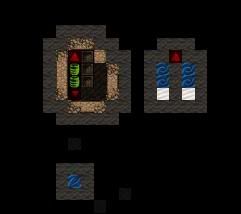
Fill in the walls:
Add in a second drain/shaft. Build in appropriate walls:

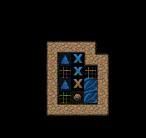
Here the pump is placed:

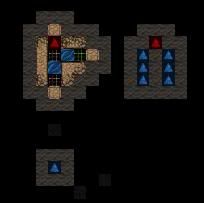
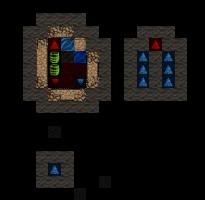
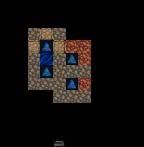
Here in the second aquifer level we can start placing walls. The drain placement here can be tricky because it is better to hold off piercing the drain shafts until later.
Seal off the left side:
Here you can see the first pump placed. We had to remove the grates to put it in. We also need to cut one additional wall out so that dwarves can move up and down the ramps (later). Note the grates that were added as a safety precaution. They can be removed after the wall is placed:
Deconstruct the pump. Channel out the floor underneath it and replace it with wood. Then rebuild the pump. This eliminates the water that pours down from the aquifer based ceiling.

Channel the tile out directly beside the pump and replace it with a floor. If you check the next picture you will see why I cut this one away. It opens up the top side right drain in the aquifer layer below so I can clear it out.
This is what will probably take the longest time to accomplish. The miners need to cut out a ramp and then cut the corresponding drainage tile. Then you grate it over of course.

Ok so each channel we cut now should remove an aquifer bearing floor as well as the aquifer wall below. Then build in flooring.
One level down we need to dig and place walls so they line up with walls that were placed above.

We are going to start having access issues unless we add some stairs so in they go (Update: check the third post for better stair placement):
I finished placing floors on the first aquifer level:
Build in the stairs on the second aquifer layer. Clean up and place corresponding walls and drains. Just a note: eventually for the next aquifer layer down we will have to remove the constructed stairs and dig out the aquifer tile underneath it. It is better to work with at least two staircases. This allows you to cut an aquifer tile out on one and then reconstruct the stairs. It fixes access problems.

Add in the third screwpump.

I must admit that this is actually only a two sand layer aquifer so the next part is stone... still useful for how to adapt the way you drill down using pumps. Smooth in the stone layers:
Add in drains:
Here the pump was deconstructed and the flooring replaced with non-leaking flooring. Then the second staircase is deconstructed and a channel cut so that the stairs can be fixed.
Smooth the walls cut the ramp away and add stairs and another drain. You can smooth walls diagonally; take advantage of this to cut down on the amount of aquifer bearing walls you have to deal with:
Here the third aquifer layer is ready to have a pump installed:
And on we go... until we hit dry rock.


 Author
Topic: Infinite Aquifer Pump Stack Guide: going....doooown. Picture heavy. (Read 3937 times)
Author
Topic: Infinite Aquifer Pump Stack Guide: going....doooown. Picture heavy. (Read 3937 times)